Your First Function
This tutorial walks you through creating, deploying, and testing your first function in Crude Functions. You’ll learn the complete workflow from writing code to calling your endpoint.
What We’ll Build
Section titled “What We’ll Build”A simple “Hello World” function that:
- Responds with JSON
- Shows the current timestamp
- Includes request metadata
- Demonstrates hot-reload capability
Prerequisites
Section titled “Prerequisites”Before starting, make sure you have:
- Crude Functions running (function port at
http://localhost:8000, management athttp://localhost:9000) - Completed the initial setup (created your admin account)
- Access to the web UI or API
If you haven’t installed Crude Functions yet, see the Getting Started guide.
Understanding Code Sources
Section titled “Understanding Code Sources”Before we create our first function, let’s understand how Crude Functions organizes your code.
Code is organized into code sources. Each code source is represented by a directory. Think of them as separate folders for different projects or deployment environments. Currently there are two types of code sources:
- Manual code sources - Upload and edit files directly via the web UI
- Git code sources - Automatically sync files from a Git repository
In this guide, we’ll focus on the manual code source to keep things simple.
Creating a Code Source
Section titled “Creating a Code Source”When you first access the Code Management Page 📁, you will need to create your first code source:
- Navigate to the Code Management Page 📁 or go to
http://localhost:9000/web/code - Click “New Code Source” button
- Choose the “Create Manual Source”
- Enter a name of the new source - this will be the name of the created directory (e.g.,
my-functions) - Click “Create Source”
For the rest of this tutorial, we’ll assume you have a source named my-functions. If your source has a different name, just substitute it wherever you see my-functions in the examples.
Step 1: Create the Handler File
Section titled “Step 1: Create the Handler File”Every function in Crude Functions is a TypeScript or JavaScript file with a default function export in the appropriate format. Let’s create our first handler.
- Go to the 📁 code management page at
http://localhost:9000/web/code - Click on your code source (e.g.,
my-functions) to open it - Click the
Upload New Filebutton - Create a file called
hello.tswith the following code:
export default async function (c, ctx) { return c.json({ message: "Hello from Crude Functions!", timestamp: new Date().toISOString(), requestId: ctx.requestId, });}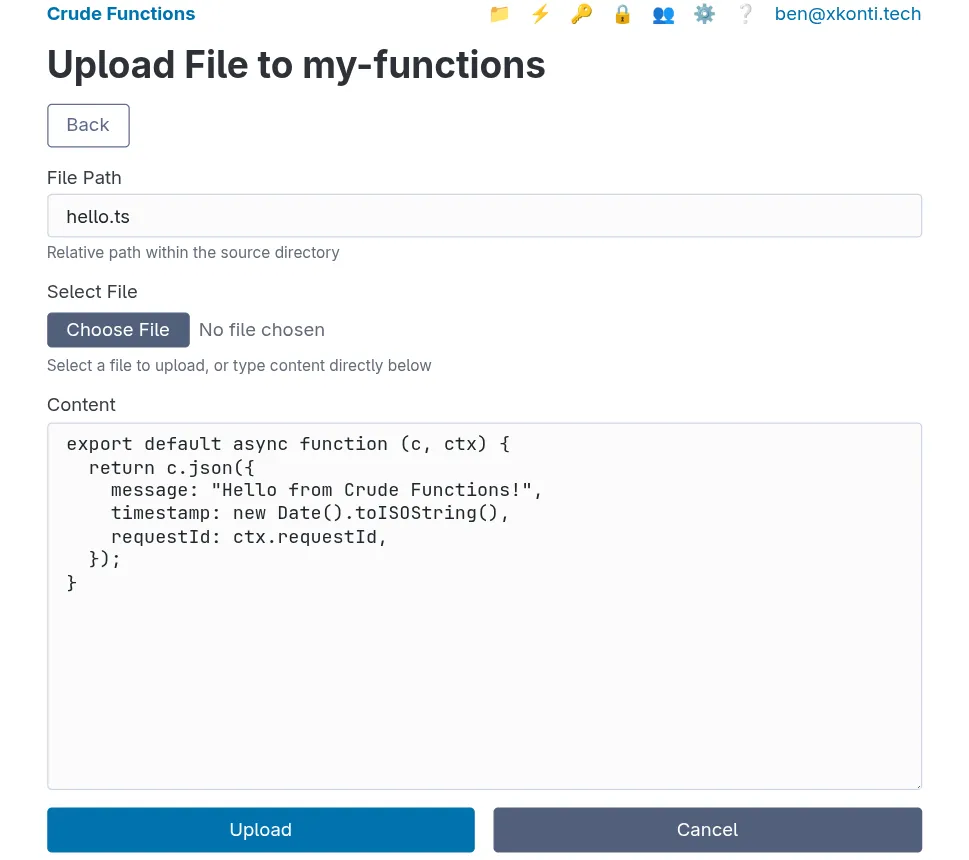
Understanding the Handler Structure
Section titled “Understanding the Handler Structure”Every function handler receives exactly two parameters:
| Parameter | Type | Purpose |
|---|---|---|
c | Hono Context | Request/response handling (like Express req/res) |
ctx | Function Context | Route metadata, params, query, secrets, request ID |
The c parameter lets you:
- Read request data (
c.req.json(),c.req.header(), etc.) - Send responses (
c.json(),c.text(),c.html(),c.redirect())
The ctx parameter provides:
ctx.params- Path parameters (e.g.,/users/:id)ctx.query- Query string parametersctx.requestId- Unique request identifierctx.authenticatedKeyGroup- API key group (if authenticated)ctx.getSecret()- Access to secretsctx.route- Route configuration details
See the Handler Context Reference for the complete API.
Step 2: Register the Route
Section titled “Step 2: Register the Route”Now that we have our handler file, we need to register it as a function route.
- Navigate to
http://localhost:9000/web/functions(the ⚡ tab) - Click the “Create New Function” button
- Fill in the form:
| Field | Value | Description |
|---|---|---|
| Name | hello-world | Unique identifier for the function |
| Description | My first function | Human-readable description (optional) |
| Handler | my-functions/hello.ts | Path to handler file in format sourceName/fileName.ts |
| Route | /hello | URL path where function will be accessible |
| Methods | GET | HTTP methods allowed |
| API Keys | (leave empty) | No authentication required for now |
- Click “Create”
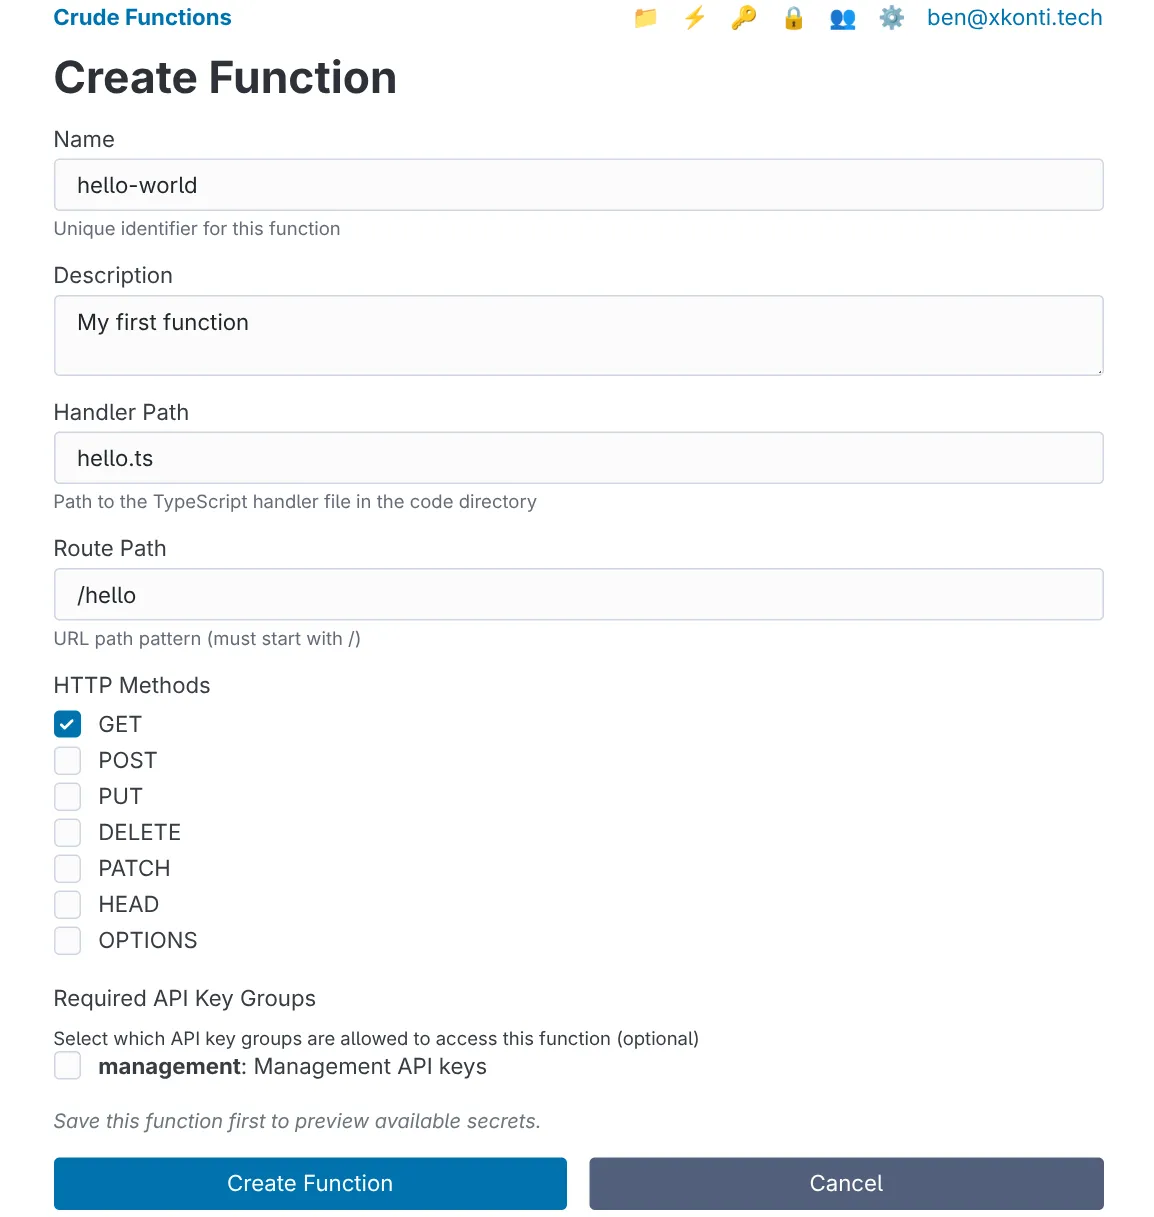
You should see your new function in the functions list with a green “Enabled” status.

Note: The handler path must include the source name. If your source has a different name, use yourSourceName/hello.ts instead.
Step 3: Test Your Function
Section titled “Step 3: Test Your Function”Your function is now live. Let’s test it.
curl http://localhost:8000/run/helloYou should see a JSON response like:
{ "message": "Hello from Crude Functions!", "timestamp": "2026-01-16T05:07:24.475Z", "requestId": "dc791018-0edf-4b15-a8e0-e6d81bd78ff6"}Step 4: View Logs
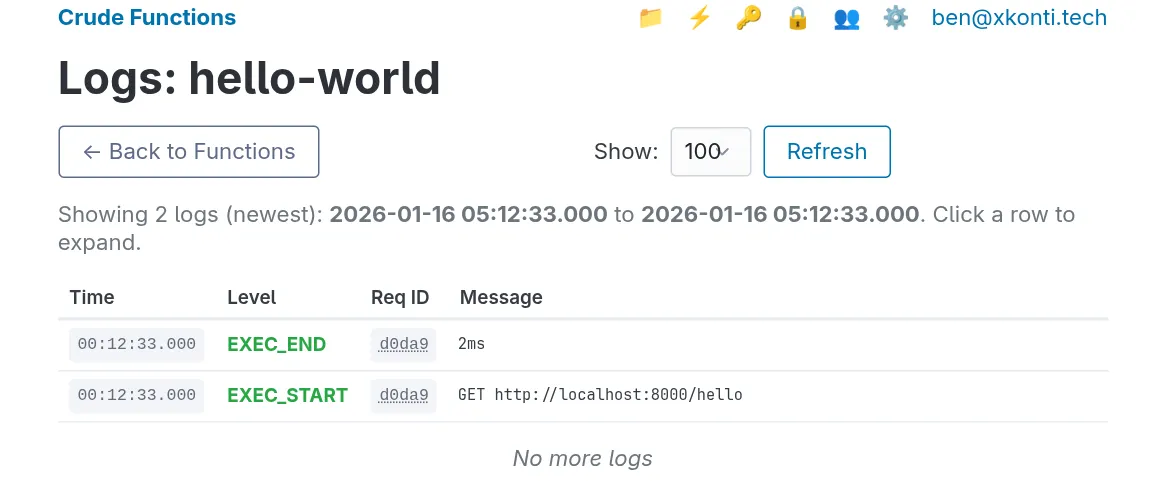
Section titled “Step 4: View Logs”Crude Functions automatically captures all console output from your functions.
- Go to
http://localhost:9000/web/functions - Click the 📝 button on the function entry
The only thing you’ll see are the EXET_START and EXEC_END events because our function doesn’t write anything to the output. Let’s add some logging.
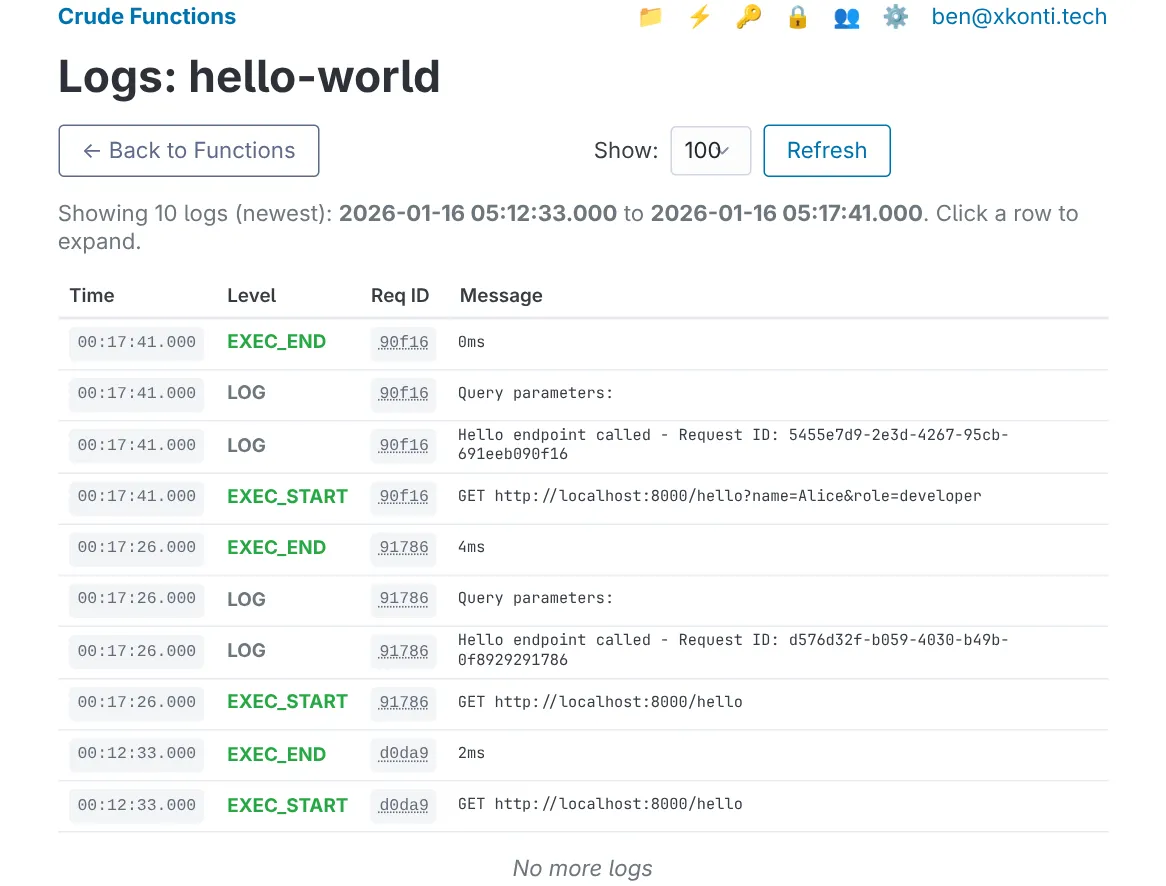
Step 5: Add Logging and Hot-Reload
Section titled “Step 5: Add Logging and Hot-Reload”Since we’re using a manual source, we can directly edit files via the web UI. Go to your code source, find hello.ts, and edit it to add some console output:
export default async function (c, ctx) {  console.log(`Hello endpoint called - Request ID: ${ctx.requestId}`);  console.log(`Query parameters:`, ctx.query);
  return c.json({    message: "Hello from Crude Functions!",    timestamp: new Date().toISOString(),    requestId: ctx.requestId,    query: ctx.query,  });}
Save the file. That’s it - no restart needed.
Test the hot-reload
Section titled “Test the hot-reload”# Call it without query parameterscurl http://localhost:8000/run/hello
# Call it with query parameterscurl "http://localhost:8000/run/hello?name=Alice&role=developer"Response with query parameters:
{ "message": "Hello from Crude Functions!", "timestamp": "2026-01-16T05:17:41.122Z", "requestId": "5455e7d9-2e3d-4267-95cb-691eeb090f16", "query": { "name": "Alice", "role": "developer" }}Check the logs
Section titled “Check the logs”Go back to the web UI and refresh the Logs tab. You should now see entries like:
Step 6: Handle Path Parameters
Section titled “Step 6: Handle Path Parameters”Let’s make our function more dynamic by accepting a path parameter.
Update the route
Section titled “Update the route”- Go to
http://localhost:9000/web/functions - Click ✏️ on your
hello-worldfunction - Change the Route Path to
/hello/:name - Click “Save”
Update the handler
Section titled “Update the handler”Edit hello.ts to use the path parameter:
export default async function (c, ctx) {  const name = ctx.params.name || "Guest";
  console.log(`Greeting ${name} - Request ID: ${ctx.requestId}`);
  return c.json({    message: `Hello, ${name}!`,    timestamp: new Date().toISOString(),    requestId: ctx.requestId,  });}
Test with different names
Section titled “Test with different names”curl http://localhost:8000/run/hello/Alice# Response: {"message": "Hello, Alice!", ...}
curl http://localhost:8000/run/hello/Bob# Response: {"message": "Hello, Bob!", ...}
curl http://localhost:8000/run/hello/Claude# Response: {"message": "Hello, Claude!", ...}Step 7: Handle POST Requests
Section titled “Step 7: Handle POST Requests”Functions can handle multiple HTTP methods. Let’s add POST support.
Update the route
Section titled “Update the route”- Edit your function in the web UI
- Change HTTP Methods to include both
GETandPOST - Save
Update the handler to handle both methods differently
Section titled “Update the handler to handle both methods differently”export default async function (c, ctx) { const method = c.req.method;
// Handle GET request if (method === "GET") { const name = ctx.params.name || "Guest"; console.log(`GET request - Greeting ${name}`);
return c.json({ message: `Hello, ${name}!`, timestamp: new Date().toISOString(), }); }
// Handle POST request if (method === "POST") { const body = await c.req.json(); console.log(`POST request - Received:`, body);
return c.json({ message: `Hello, ${body.name || "Guest"}!`, received: body, timestamp: new Date().toISOString(), }, 201); }
// Return error, even though Crude Functions won't let those requests // into the handler if methods are not allowed in function definition. return c.json({ error: "Method not allowed" }, 405);}Test POST requests
Section titled “Test POST requests”# POST with JSON bodycurl -X POST http://localhost:8000/run/hello/someone \ -H "Content-Type: application/json" \ -d '{"name": "Alice", "role": "developer"}'Response:
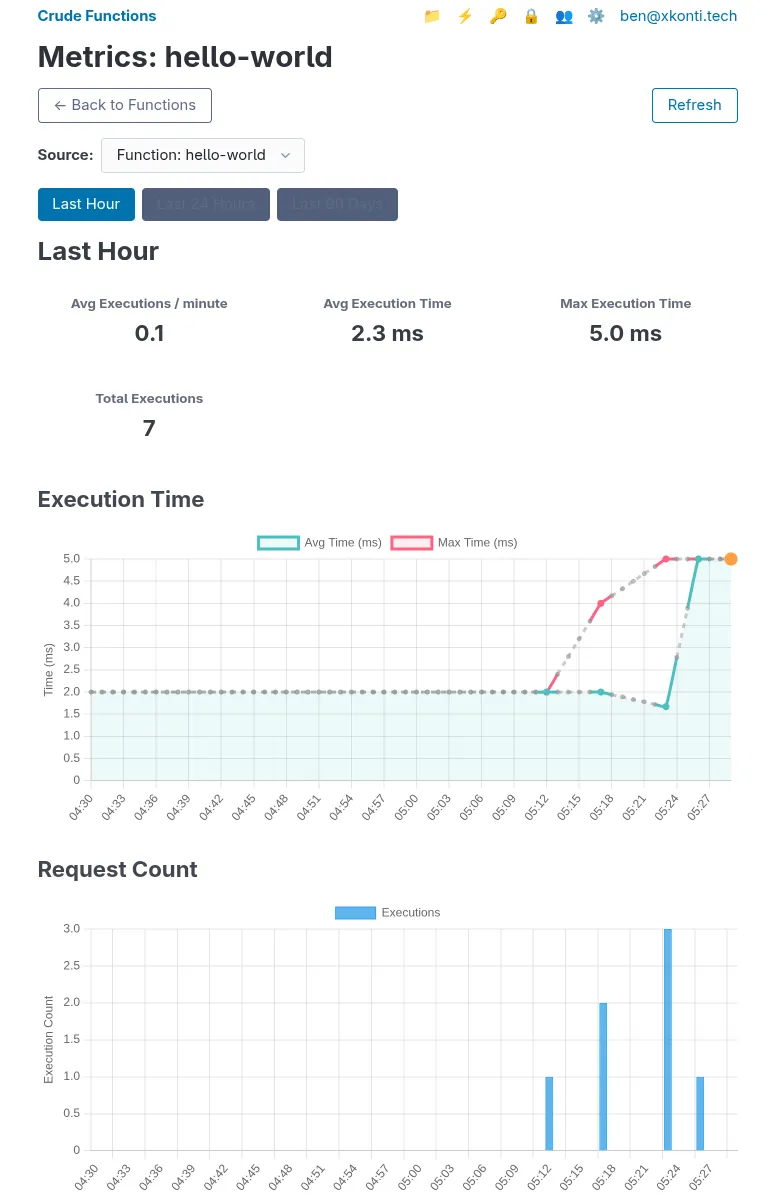
{ "message": "Hello, Alice!", "received": { "name": "Alice", "role": "developer" }, "timestamp": "2026-01-16T05:26:53.224Z"}Step 8: View Execution Metrics
Section titled “Step 8: View Execution Metrics”Crude Functions tracks execution metrics for every function call.
- Go to the functions management page in the Web UI
- Click on the 📊 button your hello-world function to view it’s metrics
You’ll see charts showing:
- Execution time - Average and maximum response times
- Request count - Number of executions over time
The metrics are aggregated by minute, hour, and day depending on the time range you select.
Step 9: Enable CORS (Optional)
Section titled “Step 9: Enable CORS (Optional)”If you want to call your function from a web browser on a different domain, you’ll need to enable CORS. Skip this step if you’re only calling functions from server-side code or tools like curl.
Why CORS?
Section titled “Why CORS?”Browsers block JavaScript from making requests to different domains unless the server allows it. For example, if your frontend is at https://surrealdb.com and Crude Functions is at https://xkonti.tech, the browser will block the request without CORS headers.
Note: Many frontend dev servers (Vite, Webpack, Quasar, etc.) proxy API requests, hiding CORS issues until deployment. If your dev setup proxies requests, you won’t see CORS errors locally but will in production. Curl, Postman, and server-side code don’t enforce CORS - it’s a browser-only security feature.
Enable CORS for your function
Section titled “Enable CORS for your function”- Edit your
hello-worldfunction in the web UI - In HTTP Methods, make sure OPTIONS is checked
- Check the Enable CORS checkbox
- In Allowed Origins, enter your frontend URL (e.g.,
https://surrealdb.com) or*for any origin - Click Save
Test from a browser
Section titled “Test from a browser”Create an HTML file and open it in your browser:
<!DOCTYPE html><html><body>  <button onclick="testCORS()">Call Function</button>  <pre id="result"></pre>
  <script>    async function testCORS() {      try {        const response = await fetch('http://localhost:8000/run/hello/Browser');        const data = await response.json();        document.getElementById('result').textContent = JSON.stringify(data, null, 2);      } catch (error) {        document.getElementById('result').textContent = 'Error: ' + error.message;      }    }  </script></body></html>
If CORS is configured correctly, clicking the button shows the JSON response. If not, you’ll see an error in the browser console about CORS policy.
For more CORS options like credentials and custom headers, see the CORS Guide.
Next Steps
Section titled “Next Steps”Congratulations! You’ve created, deployed, and tested your first function. Here’s what to explore next:
Add Authentication
Section titled “Add Authentication”Protect your function with API keys:
- Go to the API key management page
- Create a new key group (e.g.,
api) - Add an API key to the group
- Edit your function select the new group in the Required API Key Groups section
- Test with authentication:
# Without key - will failcurl http://localhost:8000/run/hello/Alice
# With key - will workcurl -H "X-API-Key: your-key-value" http://localhost:8000/run/hello/Alice
Use External Packages
Section titled “Use External Packages”Add external dependencies to your function:
import { format } from "npm:date-fns";import { camelCase } from "npm:lodash-es";
export default async function (c, ctx) {  const name = ctx.params.name || "Guest";  const formatted = camelCase(name);  const timestamp = format(new Date(), "PPpp");
  return c.json({    message: `Hello, ${formatted}!`,    timestamp,  });}
Deno will automatically download and cache the packages on first import.
{ "message": "Hello, someone!", "timestamp": "Jan 16, 2026, 12:33:30 AM"}Work with Secrets
Section titled “Work with Secrets”Store sensitive data like API keys securely:
- Go to
http://localhost:9000/web/secrets - Add a global secret:
- Name:
GREETING_PREFIX - Value:
Welcome to Crude Functions
- Name:
- Update your handler:
export default async function (c, ctx) {  const prefix = await ctx.getSecret("GREETING_PREFIX") || "Hello";  const name = ctx.params.name || "Guest";
  return c.json({    message: `${prefix}, ${name}!`,    timestamp: new Date().toISOString(),  });}
Result:
{ "message": "Welcome to Crude Functions, someone!", "timestamp": "2026-01-16T05:36:15.041Z"}Create Shared Utilities
Section titled “Create Shared Utilities”Organize your code with shared modules. Within your code source (e.g., my-functions), create a file lib/formatters.ts - this will create a subdirectory called lib with formatters.ts inside.
export function formatGreeting(name: string): string {  return `Hello, ${name.trim()}!`;}
export function getTimestamp(): string {  return new Date().toISOString();}
Then update hello.ts to use it with a relative import:
import { formatGreeting, getTimestamp } from "./lib/formatters.ts";
export default async function (c, ctx) {  const name = ctx.params.name || "Guest";
  return c.json({    message: formatGreeting(name),    timestamp: getTimestamp(),  });}
The files would be organized in your source like this:
my-functions/├── hello.ts└── lib/ └── formatters.tsYou can also reference code from other code sources. If you were to create a separate code source named lib and place the formatters.ts inside, from hello.ts you could reach it via ../lib/formatters.ts.